
27 Easy Exercises That Improve Posture and Relieve Tension
Jan 10, 2025
Have you ever caught yourself slumped over your desk or hunching over your phone? Poor posture can be easy to ignore, but your body eventually lets you know there is a problem.
Fortunately, correcting your posture doesn’t have to be a tedious task. In this guide, we will explore a variety of exercises that improve posture, helping you relieve tension, move more freely, and feel better about yourself.
One effective way to improve your posture is with the Posture AI’s posture app. This friendly app makes posture correction easy by analyzing your posture and providing tailored exercise programs to help you improve. Try it out for free here.
Table of Contents
Can I Correct My Posture with Exercise?

Posture: Mindfulness in Motion
While mindfulness is some of it, our posture is a product of how we live our lives. Unfortunately, that means many of us have less than ideal posture, whether because we sit at a desk all day, work on our feet for hours, or play a particular sport. Still, it’s worth paying attention to. Maintaining proper posture from head to toe can help you avoid pain, prevent injury, and move more efficiently overall, says Austin Cagley, who leads Global Instructor Development at Peloton. It has a wave of repercussions over your daily life and workouts.
“Posture is the alignment of your body at rest or during movement,” Cagley explains—and it’s more than just pulling your shoulders back. “Good posture involves a neutral spine, balanced muscle engagement, and proper alignment of joints. This alignment allows for efficient movement, reduces wear and tear on your body, and prevents pain.” What does the ideal posture look like? “good posture is a spectrum rather than one set position,” Dorian explains.
Generally, “we're looking to stack the head over the shoulders, the shoulders over the hips, and the hips over the ankles.” Three body regions typically dictate that position, he says: the cervical spine (neck), scapulas (shoulder blades), and pelvis (hips).
How to Improve Your Posture With Exercise
You must first pinpoint what’s causing any issues to improve your posture using exercise. “Understanding how we arrived at our habitual postures is important for deciding which exercises or movements might help,” explains Gagliardi. Because lousy posture is often caused by muscle weakness, tightness, or imbalance, the best way to improve posture is to combine strengthening and stretching.
Together, improving the strength and endurance of postural muscles and encouraging length in tight ones can help reestablish the proper relationships between opposing muscles, Gagliardi says. “You’re looking to align the body so that your joints can move freely in all the directions they’re intended to move and restore balance to your muscles so the tension they create is equal and opposite.” Workouts that combine strengthening and stretching (like yoga, Pilates, and mobility) can help encourage this balance, too. You’ll probably recognize some of the exercises below from these types of classes.
Related Reading
• Can You Fix Bad Posture
• Does Working Out Improve Posture
• How to Fix Lower Back Posture
27 Best Exercises That Improve Posture
Generally, to improve posture, you’ll want to focus on strengthening the core, back, and shoulder muscles and stretching the chest, hamstrings, and hip flexors, Cagley says. However, depending on what’s going on in your body, you may need to focus on other things. If you’re experiencing any type of pain or want a more personalized assessment, it’s a good idea to consult a physical therapist for guidance. In the meantime, these posture exercises and stretches help tackle the most common imbalances.
1. Quadruped Chin Tuck with Scapular Push-up
This posture exercise, recommended by Dorian, helps strengthen your deep neck stabilizers and serratus anterior, which tend to weaken if you sit with forward-rounded shoulders, he says. Start on your hands and knees in a quadruped position. Tuck your chin slightly to lengthen the back of your neck. Your head should be in line with your shoulders. Lower your chest between your shoulders and squeeze your shoulder blades together. Keep your core engaged, and try not to let your ribs flare open or your lower back arch. Press into your palms as if trying to push the floor away, and allow your upper back to lift and shoulders to round. Repeat for 10-30 seconds. Do 3-5 sets.
Muscles worked
deep neck stabilizers, serratus anterior (a fan-shaped muscle that lies along the ribs, under the shoulder blade)
2. Seated Band Pull-Apart
Dorian says this move combines both upper-body and lower-body postural work. You’re using your rhomboids and middle trapezius to retract your shoulder blades while also being aware of your core: try not to allow your ribs to flare open or arch your lower back. Focus on keeping your shoulders stacked over your hips. Sit on a chair or bench with your feet flat on the floor. Hold a long resistance band at belly button height in both hands with your arms extended but not locked. Keeping your arms long, squeeze your shoulder blades together and pull your hands out to your sides until they align with your shoulders. Slowly reverse the movement, drawing your hands together before your torso. That’s one rep. Do two to three sets of 15-20 reps.
Muscles worked
upper back muscles (rhomboids and middle traps)
3. Child’s Pose
The child’s pose stretches and lengthens your spine, glutes, and hamstrings. It may also release tension in your lower back and neck.
To do this pose
Sit on your shins with your knees together, your big toes touching, and your heels splayed to the side.
Fold forward at your hips and walk your hands out before you.
Sink your hips back down toward your feet. If your thighs won’t go down, place a pillow or folded blanket under them for support.
Place your forehead on the floor or turn your head to one side.
Keep your arms extended or rest them along your body.
Breathe deeply into the back of your rib cage and waist.
Relax in this pose for up to 5 minutes while breathing deeply.
4. Forward Fold
This standing stretch releases tension in your spine, glutes, and hamstrings. It also stretches your hips and legs.
To do this pose
Stand with your big toes touching and your heels slightly apart.
Bring your hands to your hips and fold forward at your hips.
Release your hands toward the floor or place them on a block. Don’t worry if your hands don’t touch the ground — just go as far as possible.
Bend your knees slightly, soften your hips, and allow your spine to lengthen.
Tuck your chin into your chest and allow your head to fall heavy to the floor.
Remain in this pose for up to 1 minute.
5. Cat-Cow
Cat-Cow pose helps relieve tension in your torso, shoulders, and neck while promoting blood circulation and spinal mobility.
To do this pose
Come onto your hands and knees with your weight balanced evenly between all four points.
Inhale to look up, dropping your abdomen toward the ground as you extend your spine.
Exhale, arch your spine toward the ceiling and tuck your chin into your chest.
Continue this movement for at least 1 minute.
6. Back to the Wall
One way to see where your posture is going wonky is to stand with your back against a wall. “If you’re standing straight with good posture, the back of your head as well as your shoulder blades, hip and back of your legs should all touch the wall,” Dr. Jennifer Danzo, DPT, advises. Use the wall to support you as you position your body so you’re flush against it. Pull your head back. Roll your shoulders. Tuck your pelvis. Take time to feel what it’s like to be in proper posture. It may feel uncomfortable or unnatural at first. That’s OK. The more you practice, the more natural it’ll start to feel. And the more you’ll begin to recognize when you’re letting old posture habits take over.
7. Wall Angels
Remember when you were a kid, you would lie in the fresh snow and wave your arms up and down to make a snow angel? A similar move can help you stretch your arms and chest muscles to correct your posture.
Here’s how to do it
Stand against a wall with your arms at your sides. (Remember that good posture position, where your head, shoulder blades, hips, and legs touch the wall.)
Face your palms out. Keep your gaze straight ahead.
Slowly slide your arms out to the side and up over your head. Keep the backs of your hands in contact with the wall the whole way up. And keep the rest of your body in proper posture.
Hold for a few seconds.
Slowly lower your arms back down. Again, keep the backs of your hands in contact with the wall on the way down and maintain a strong posture.
You can also try this exercise lying on the floor with straight legs.
8. Dead Bug Variation
Both Dorian and Gagliardi recommend this move, which asks you to find a neutral position with the lower back, stabilize your core, and strengthen your hip flexors. “This is a common misconception: We feel tightness, stiffness in the hip flexors, and we think we just need to stretch,” Dorian explains. “But the hip flexors are important in terms of movement and strength and potential production, and it's just necessary to have strength and length of the hip flexors.”Lie face-up on the floor with your arms extended toward the ceiling and your knees bent at 90 degrees, feet lifted off the ground, and shins parallel to the floor. Press the right palm into the left thigh. Hold this position, extend your right leg, and reach your left arm by ear, hovering both off the floor. Keep your core engaged, and don’t let your lower back arch off the ground.Bring your arm and leg back to the center to return to start. Do 10-15 reps, then repeat on the other side. Do 2-3 sets.
Muscles worked
hip flexors, core.
9. Single-leg Glute Bridge with Knee Drive
Dorian says this move translates to standing posture, which asks your gluteus maximus to extend your hip and hold your body upright. At the same time, you’re working the hip flexor mobility on the opposite side. Lie face-up on the floor with your knees bent and feet flat on the floor. Engage your core, tucking your hips under just slightly, and place your weight into the right heel. Press into your right heel to lift your hips off the ground into a glute bridge. Keeping your left knee bent at 90 degrees, draw your left knee toward your chest. Press your right hand into your left thigh and maintain tension, pushing your knee into your hand and your hand into your knee. Hold this position for 10-30 seconds, trying not to let your hips tilt side to side or back arch. Repeat on the other side. Do two to three sets.
Muscles worked
glutes, hip flexors, hamstrings, core.
10. Plank
Cagley says planks are great for core and shoulder strength and promote a neutral spine. Modify by resting your knees on the floor to ensure the correct form. Start on your hands and knees, with your palms directly underneath your shoulders. Extend each leg, balancing on the balls of your feet, and lift your knees off the floor to find a plank position. Keep your neck long, shoulder blades squeezing together, and core engaged. Do not let your upper back round toward the ceiling or your hips drop toward the floor. Hold this position for 15-30 seconds.
Muscles worked
core, shoulders, back, glutes, quads.
11. Bird-Dog
This posture exercise “improves core stability and spinal alignment while stretching the hips and back,” says Cagley. Start on your hands and knees, with your palms on the floor directly underneath your shoulders and knees underneath your hips. Engage your core to find a neutral spine. Maintaining this position, lift your right hand off the floor and extend your arm forward at shoulder height, bicep next to your ear. At the same time, extend your left leg back behind you at hip height, flexing your foot, with your knee pointing down at the floor. Hold for one second, then return your hand and foot to the floor. Repeat on the opposite side. Do 8 reps.
Muscles worked
the upper back, lower back, core, and glutes.
12. Superman
The classic Superman exercise “strengthens back muscles and counteracts slouching,” says Cagley. Lay face-down on the floor with your arms and legs outstretched. Keep your neck long and allow your forehead to rest on the floor. Keeping your gaze on the floor, lift your arms and legs a few inches. Hold for one second, then lower them to the floor. That’s one rep. Do 8 reps.
Muscles worked
upper back, lower back, core, glutes, hamstrings.
13. Pull your head back
One common posture mistake people make is a “head-forward posture.” Your head hangs out too far in front of your shoulders. “When our head gets forward, the weight of the head is pulling on the muscles in the back of the neck and puts extra stress on those muscles,” Dr. Danzo explains. “So, the muscles in your chest get tight and your shoulders start to round forward.” To counteract all that, practice moving your head back into position. While sitting, carefully pull your chin backward without changing your eye level. That is, don’t look up or down. You can use your fingertips to gently coax your chin back and hold it there for several seconds. I'm not sure if you’re doing it right. Try doing it while standing with your back against the wall. Focus your eyes on a spot in front of you at a comfortable eye level and pull your head back until it touches.
14. Doorway Lunge
Flexibility and strength in your upper chest muscles are key to keeping your shoulders from rounding forward. Give those muscles a good stretch with this posture-correcting exercise.
Stand in an open doorway.
Put your arms out to your sides and bend at the elbows. Your upper arm should parallel the floor and bend 90 degrees at your elbow. (That’s called “cactus arms,” if you’re familiar with yoga terms.)
Place your palms on either side of the doorway.
Take a big step back with your right leg, leaning your weight forward into your arms. You should feel a stretch in your upper chest area and the lower part of your right leg.
Hold for a few seconds.
Repeat with your left leg back.
15. Standing Row
Strengthening your upper back can also help to keep your shoulders from rolling forward and putting pressure on your back. One exercise to help strengthen your upper back is a standing row. This can be done with a set of resistance bands if you have them. (Or just consider pulling on invisible rubber bands if you don’t have a set handy.) Attach the middle of a resistance band to a doorknob. Hold one end of the band in each hand. Bend your elbows and squeeze your shoulder blades as you draw the band back. “I tell people to graze their ribcage with their elbows. As you pull your elbows back, they should be close to your sides,” Dr. Danzo advises. “Don’t pull your elbows up high, as it can cause a pinch in your shoulders.”
16. Shoulder Blade Push
Training your body to keep your shoulders back is vital to improving poor posture. Dr. Danzo suggests this exercise:
Lie on your back with your knees bent. Keep your arms at your sides and your palms facing the ceiling. Push your shoulder blades down and back, sinking them to the ground.
“Pinching the shoulder blades helps to strengthen the back,” she adds.
17. Prone IYTWO Series
This series of moves, recommended by Gagliardi, focuses on scapular stabilization, helping to counteract the common postural issue of forward-rounded shoulders. Lie face-down on the floor with your arms and legs extended, palms facing each other. Engage your core to stabilize your spine. Pull your shoulders back and down and keep your neck long, gazing at the floor. Hold this position.
“I” Formation
Exhale and lift your arms off the floor with palms facing inward, biceps by your ears. Focus on lifting through your shoulders and not the lower back. Hold this position for 5-10 seconds, then return to the starting position. Do two to four reps.
“Y” Formation
From the same starting position, exhale and lift your arms off the floor, moving them slightly outward so your body forms a “Y” shape with palms facing inward. Hold this position for 5-10 seconds, then return to the starting position. Do two to four reps.
“T” Formation
From the same starting position, exhale and lift your arms off the floor, moving them out to the sides so your body forms a “T” shape, with your palms facing forward. Hold this position for 5-10 seconds, then return to the starting position. Do two to four reps.
“W” Formation
From the same starting position, exhale and lift your arms off the floor, bending your elbows and drawing them towards your hips to form a “W” shape. Hold this position for 5-10 seconds, then return to the starting position. Do two to four reps.
“O” Formation
Move your arms down to your sides from the same starting position. Exhale and boost your shoulders, then reach both arms behind your lower back, bending your elbows inward to overlap your hands into an “O” shape. Hold this position for 5-10 seconds, then return to the starting position. Do two to four reps.
Muscles worked
upper back and shoulders.
18. Leg Crossover Stretch
Like the Figure 4 stretch with a twist, this stretch recommended by Gagliardi targets tight hips and glutes and helps release the lower back. Lie face-up on the floor with your knees bent and feet flat on the floor. Stretch your arms out to the sides at shoulder level, palms facing upwards. Cross your right leg over the left, resting your right ankle on the left knee. Slowly press the right knee away from your body to feel a stretch in your right hip, using your right hand if needed. Hold this position for a moment, then slowly rotate your hips to the left, bringing the bottom of the right foot to rest on the floor. Avoid turning your upper body or arching your back. Hold this position for 15-30 seconds. Do two to four reps, then repeat on the other side.
Muscles worked
glutes, hips, quads, and lower back.
19. Standing Cat-Cow
A variation on the standard Cat-Cow, this standing posture helps loosen up the tightness in your back, hips, and glutes.
To do this pose
Stand with your feet about hip-width apart with a slight knee bend.
Extend your hands in front of you or place them on your thighs.
Lengthen your neck, bring your chin toward your chest, and round your spine.
Then, look up, lift your chest, and move your spine in the opposite direction.
Hold each position for 5 breaths at a time.
Continue this movement for a few minutes.
20. Chest Opener
Opening and stretching your chest is instrumental if you spend most of your day sitting, which tends to make your chest move inward.
To do this stretch
Stand with your feet about hip-width apart.
Bring your arms behind you and interlace your fingers with your palms pressing together. Grasp a towel if your hands don’t reach each other.
Keep your head, neck, and spine in one line as you gaze straight ahead.
Inhale as you lift your chest toward the ceiling and bring your hands toward the floor.
Breathe deeply as you hold this pose for 5 breaths.
Release and relax for a few breaths.
Repeat at least 10 times.
21. Downward-Facing Dog
Downward-Facing Dog is a forward bend that can be used as a resting pose to balance out the body. It can help relieve back pain while strengthening and aligning your back muscles.
To do this pose
With your stomach on the floor, press into your hands as you tuck your toes under your feet and lift your heels.
Lift your knees and hips to bring your sitting bones toward the ceiling.
Bend your knees slightly and lengthen your spine.
Keep your ears aligned with your upper arms, or tuck your chin into your chest.
Press firmly into your hands and keep your heels slightly lifted.
Remain in this pose for up to 1 minute.
22. Pigeon Pose
This hip-opening posture can also loosen up your spine, hamstrings, and glutes.
To do this pose
Come down on all fours with your knees below your hips and your hands a little bit in front of your shoulders.
Bend your right knee and place it behind your right wrist with your right foot angled to the left.
Rest the outside of your right shin on the floor.
Slide your left leg back, straighten your knee, and rest your thigh on the floor.
Ensure your left leg extends straight back (not to the side).
Slowly lower your torso to rest on your inner right thigh with your arms extended.
Hold this position for up to 1 minute.
Slowly release the position by moving your hands toward your hips and lifting your torso.
Repeat on the opposite side.
23. Thoracic Spine Rotation
Opening the chest and rotating the spine relieve tightness while increasing stability and mobility.
To do this stretch
Come onto all fours, sink your hips back down to your heels, and rest on your shins.
Place your right hand behind your head with your elbow extended to the side.
Keep your left hand under your shoulder, bring it to the center, and rest on your forearm.
Exhale as you rotate your right elbow toward the ceiling and stretch the front of your torso.
Take one long inhale and exhale in this position.
Release back down to the original position.
Repeat this movement 5–10 times, alternating sides.
24. Glute Bridge
Glute bridges help strengthen and activate your glutes while relieving lower back pain. This improves the functioning and alignment of your hips and pelvis, leading to better posture.
To do this exercise
Lie on your back, your knees bent, and your feet about hip-distance apart.
Keep your feet about a foot away from your hips.
Rest your arms alongside your body with your palms facing down.
Exhale as you lift your hips toward the sky, straightening your spine.
Hold this position for up to 1 minute at a time.
25. Isometric Pulls
Isometric pulls work your shoulder, arm, and back muscles, giving you the strength to maintain good posture.
To do this exercise
Sit in a chair with a soft back.
Make a fist with each hand and extend your arms in front of you so that they’re parallel to the floor.
Exhale as you draw your elbows back toward your shoulders and squeeze your shoulder blades together.
Breathe deeply as you hold this position for 10 seconds.
On an inhale, slowly release to the starting position.
Repeat this movement for 1 minute.
26. Supine Hamstrings Stretch
This exercise from Gagliardi stretches the hamstrings, the muscle along the back of the thigh. Lie face-up on the floor with your knees bent and feet flat on the floor; arms stretched out to the sides with your palms facing up. Extend the right leg toward the ceiling. Contract your quads (the muscles on the front of your thigh) while flexing your toes towards your body so you feel a stretch in your hamstrings and calves. Hold this position for 15-30 seconds, then relax. Do two to four reps, then repeat on the other side.
Muscles worked
hamstrings
27. Kneeling Hip-Flexor Stretch
Gagliardi recommends this hip-flexor stretch, which can help counteract the muscle-shortening that happens with long periods of sitting. Start in a half-kneeling position with your right leg bent at 90 degrees, your right foot flat on the floor, and your left knee on the floor, directly under the left hip. Place your hands on the right thigh, and find a tall spine with your core engaged. Gently lean forward into your right hip to feel a stretch in the left side hip flexor. Don’t allow your back to arch or pelvis to tilt forward. To increase the stretch, squeeze and contract the glute muscles on your left side. Hold the stretch for 30-45 seconds. Do 2-5 reps, then repeat on the other side.
Muscles worked
On hip flexors and quads.
Related Reading
• Tips for Good Posture
• Yoga for Posture Correction
• Best Sleeping Posture For Neck Pain
• Posture Correction Device
• Best Sitting Posture For Lower Back Pain
• Posture Correction Device
Improve Your Posture with Our Posture Correction App
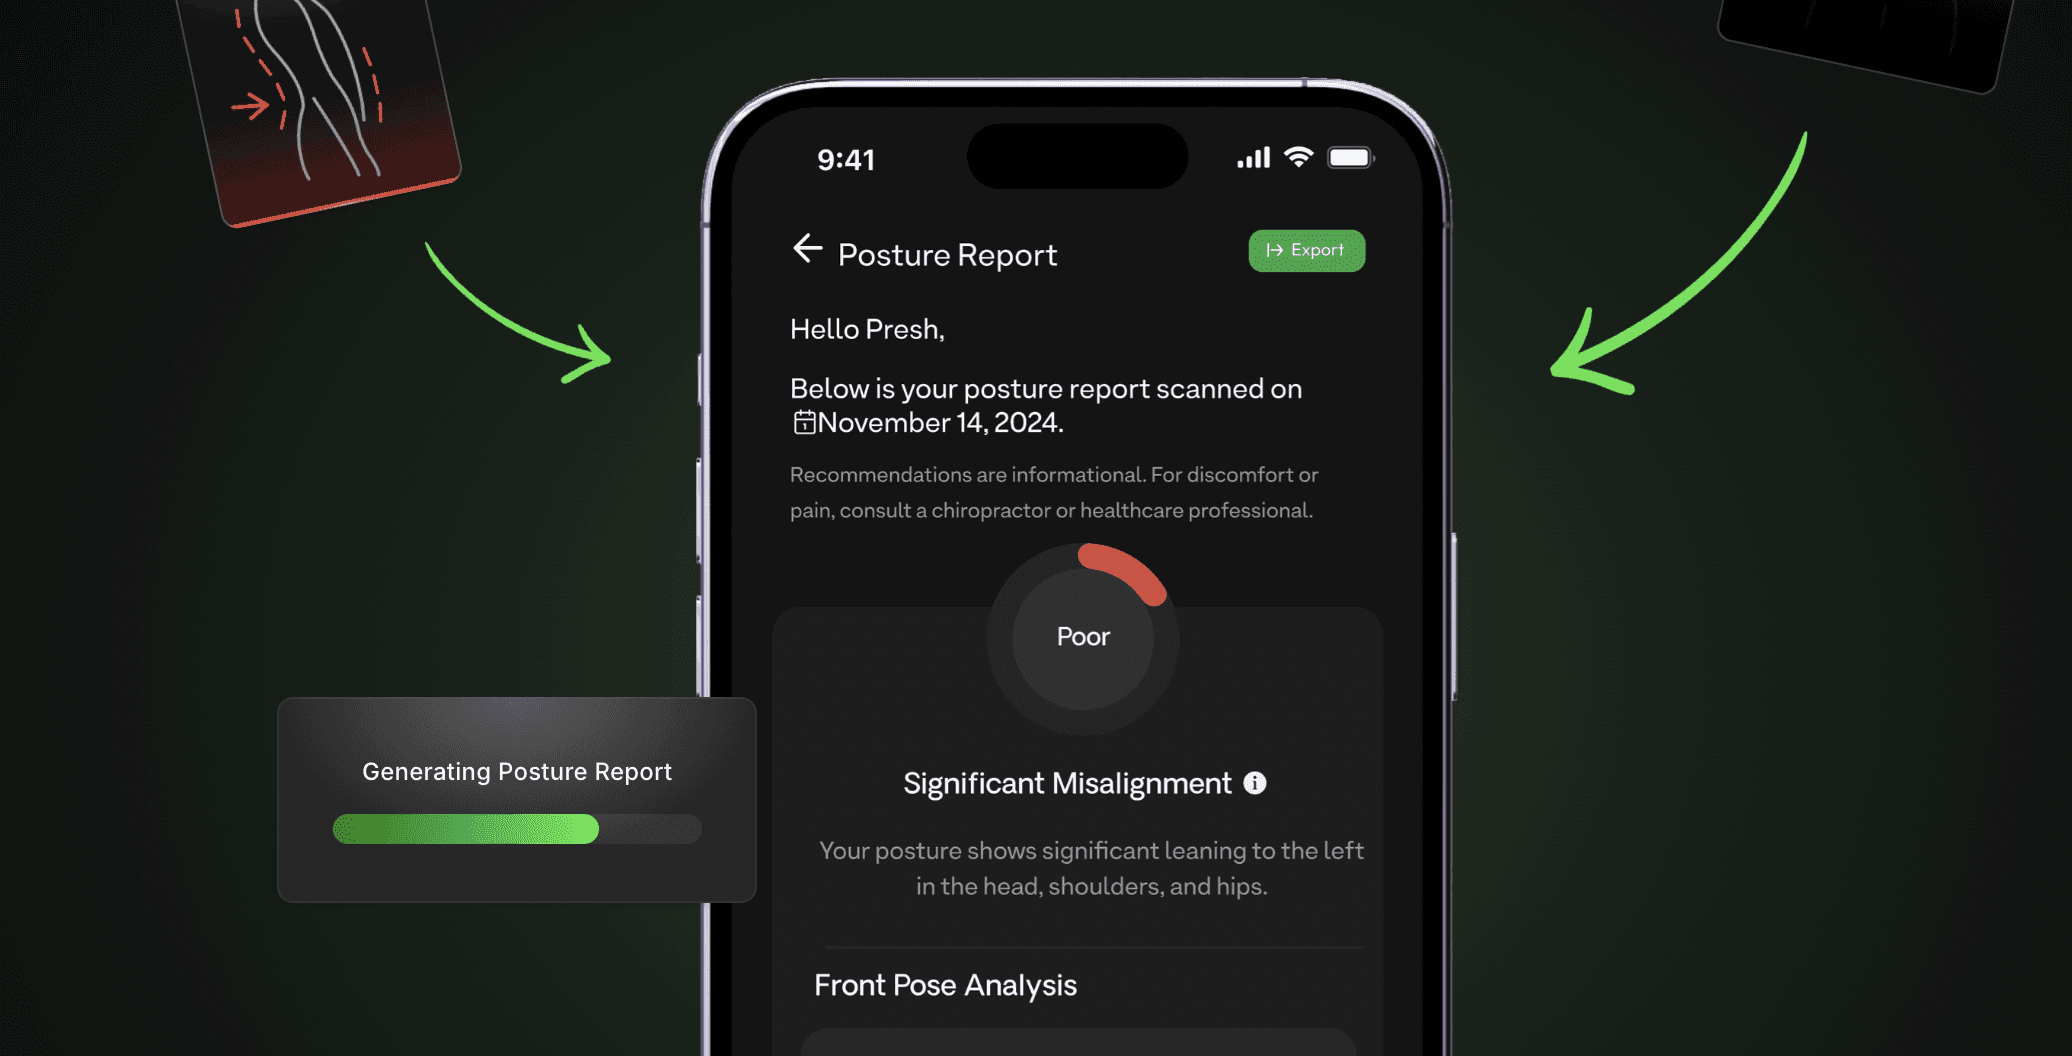
Posture AI's posture correction app transforms your posture and well-being using advanced AI technology and your smartphone camera. Our app provides personalized posture analysis, expert-guided exercises, and progress tracking to help you move and feel better. Simply take front and side photos, and our AI generates detailed reports with tailored improvement plans.
Features include instant posture scanning, AI-powered analysis, customized exercise programs, and progress monitoring. Whether looking to prevent long-term issues, reduce daily discomfort, or boost confidence, Posture AI offers an affordable, at-home solution for better alignment. Skip expensive treatments and transform your posture with just a few minutes of guided daily exercise.
Related Reading
• Electronic Posture Corrector
• Posture Adjustment Treatment
• Best Posture Brace for Rounded Shoulders
• Nugget Alternative
• Zen Alternative